Uizard.io is a cutting-edge design tool that aims to simplify the process of creating user interfaces (UI) and user experiences (UX) for both beginners and professional designers. With a combination of powerful design templates, an intuitive drag-and-drop editor, and real-time collaboration features, Uizard.io makes design more accessible and collaborative. This guide will walk you through everything you need to know to make the most of Uizard.io, from getting started to mastering advanced features like custom templates, interactive prototypes, and more.
Getting Started with Uizard.io
The first step to using Uizard.io is to sign up for an account. Uizard.io offers three different pricing plans: Free ($0/month), Pro ($12/month), and Business ($39/month). The Free plan provides access to basic features, while the Pro and Business plans offer more advanced functionalities, such as the Autodesigner feature and enhanced collaboration options.
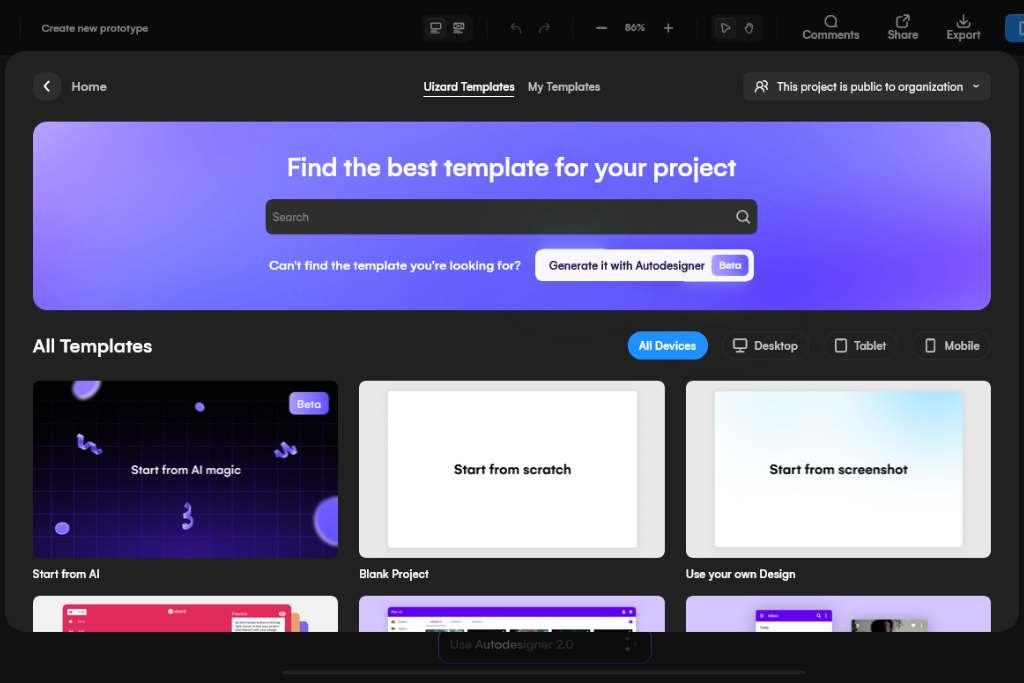
Once you’ve signed up, creating a new project is simple. You can start from scratch, use one of the many pre-built templates, or, if you’re on the Pro or Business plan, leverage the Autodesigner feature to automatically generate design layouts based on a set of inputs. This feature is especially useful for users who want to jumpstart the design process with minimal manual effort.
Key Steps for Getting Started:
- Sign Up: Choose a plan (Free, Pro, or Business) based on your needs.
- Start a New Project: Begin with a blank canvas, a pre-made template, or the Autodesigner (available for Pro and Business users).
- Explore the Interface: Familiarize yourself with Uizard.io’s clean, user-friendly interface that’s designed for efficiency.
How to Use Design Templates in Uizard.io
One of Uizard.io’s standout features is its extensive library of design templates. Templates are categorized by device type (such as mobile, desktop, and tablet), and you can also search for specific templates based on the needs of your project. These templates serve as an excellent starting point, especially for users who are new to design.
Once you’ve selected a template, Uizard.io gives you complete freedom to personalize it. You can modify the colors, typography, UI components, and even interactions to better suit your project requirements. The templates are designed to be highly flexible, allowing you to create anything from simple wireframes to fully interactive prototypes.
Steps for Using Templates:
- Access the Template Library: From the project creation screen, choose from various templates based on device or search for specific designs.
- Customize the Template: Modify components, colors, fonts, and interactions to fit your project.
- Save for Future Use: You can save customized templates for future projects, streamlining the design process.
Utilizing the Drag-and-Drop Editor in Uizard.io
Uizard.io’s drag-and-drop editor is intuitive and easy to use, making it accessible even to users without prior design experience. The editor allows you to drag UI components from the left control panel and place them onto your design screen. One of the most helpful features of this editor is the snapping guidelines, which help you align elements with precision, ensuring a polished and professional look.
The drag-and-drop interface simplifies the process of placing and organizing elements, whether you’re working on a complex dashboard design or a simple mobile app screen. With just a few clicks, you can adjust the size, position, and orientation of elements, allowing for rapid design iterations.
How to Use the Drag-and-Drop Editor:
- Drag Components: Pull UI elements from the left panel and place them onto your canvas.
- Use Snapping Guidelines: Align components using the snapping guidelines for clean, well-structured designs.
- Customize Each Element: Easily resize, reposition, and modify components as needed.
How to Use UI Components in Uizard.io
Uizard.io offers a comprehensive library of pre-made UI components, which includes buttons, navigation bars, forms, cards, and more. These components are fully customizable, allowing you to adjust their size, color, and interaction properties to match your design.
Finding components is also quick and easy, thanks to the built-in tags and search function. Simply type in what you’re looking for, and Uizard.io will present a range of relevant components. This feature is particularly useful for larger projects where manually browsing through the entire library might be time-consuming.
Key Tips for Using UI Components:
- Browse the Components Library: Access a wide range of premade UI elements from the left panel.
- Drag and Drop Components: Add components to your design by dragging and dropping them onto the canvas.
- Customize to Fit Your Project: Modify components by adjusting colors, typography, and sizing to match your design style.
Adding Images in Uizard.io
Uizard.io provides several options for incorporating images into your design. You can search for royalty-free images through Unsplash, browse animated GIFs through Giphy, or upload your own images directly from your device. Additionally, Uizard.io integrates AI-generated images, which can add a unique flair to your design.
To add an image, simply drag and drop it from the left control panel onto your design. Once placed, you can adjust the image’s size, position, and cropping to fit your layout. Uizard.io makes it easy to integrate visual elements into your design without compromising on quality or customization.
Steps for Adding Images:
- Search or Upload Images: Use Unsplash, Giphy, or upload your own images directly from your device.
- Drag and Drop Images: Add images to your design by dragging and dropping them onto the canvas.
- Adjust Image Properties: Resize, crop, and position images to fit your design perfectly.
Creating Screen Interactions in Uizard.io
A key feature that sets Uizard.io apart from many design tools is its ability to create interactive prototypes. With just a few clicks, you can link UI components, buttons, or text to different screens, creating a fully interactive experience. This is particularly useful when designing complex apps or websites that require a clear user flow.
To create an interaction, select an element and click on the lightning icon, then choose the target screen or element you want to link it to. Uizard.io also allows you to manage and view all your interactions in the ‘Interact’ tab, giving you full control over the flow of your design.
Steps to Create Interactions:
- Select an Element: Choose any component or text that you want to make interactive.
- Click the Lightning Icon: Use this tool to link the element to another screen or component.
- Manage Interactions: View and adjust interactions through the ‘Interact’ tab.
Using Custom Templates in Uizard.io
For projects that require consistent design elements across multiple screens, Uizard.io offers the ability to create custom templates. This feature allows you to save frequently used components or layouts, so you can reuse them in future projects, improving both efficiency and consistency.
To create a custom template, select the elements you wish to save and click ‘Create Template’ from the right design control panel. These custom templates will be saved under the ‘My Templates’ section, allowing you to access them across all your projects.
Steps for Creating Custom Templates:
- Select Elements: Choose components or layouts you want to save as a template.
- Create Template: Click the ‘Create Template’ option from the right control panel.
- Save Under ‘My Templates’: Access and reuse your custom templates across different projects.
Previewing Projects in Uizard.io
Once you’ve designed your UI and added interactions, Uizard.io allows you to preview your project. The preview mode simulates the user experience, allowing you to interact with your design as a user would. This feature helps identify any potential issues with functionality or flow before finalizing the project.
In preview mode, you can also leave notes or comments, which is particularly useful for collaboration. Team members can provide feedback on specific screens or components, allowing for continuous improvement of the design.
Steps for Previewing Projects:
- Click the Preview Button: Enter preview mode to test how your design functions.
- Interact with Your Design: Navigate through your prototype as a user would to check for any issues.
- Leave Notes and Comments: Collaborate with your team by adding feedback directly in the preview mode.
How to Share Your Uizard.io Project
Sharing your project with others is a breeze in Uizard.io. The platform offers multiple ways to share your work, whether for feedback or collaboration. You can send an invitation via email, share a direct link, or even generate an embed code for external use.
When you share a project, collaborators can leave comments, suggest changes, or even edit the project if given the appropriate permissions. This makes Uizard.io an excellent tool for team projects, as it supports real-time feedback and collaboration.
Steps for Sharing Your Project:
- Click the Share Button: Access sharing options from the top-right corner of your screen.
- Invite via Email or Link: Send an email invitation or share a direct link to your project.
- Collaborate in Real-Time: Allow collaborators to view, comment, or edit your project.
Collaborating in Uizard.io
One of Uizard.io’s most powerful features is its real-time collaboration functionality. Whether you’re working on a small project or a large-scale design initiative, Uizard.io allows multiple team members to work on a project simultaneously. This ensures that ideas are shared quickly, and changes can be made in real-time.
The notes feature within Uizard.io facilitates smooth communication between team members. You can leave comments, suggestions, and even resolve feedback threads once an issue has been addressed. This collaborative